Double Top/Bottom Scalp: wait for the neckline, then trade
A double top ends one of two ways: a neckline break, or a sweep above the second top before the drop. Trade both, but only once you know which.
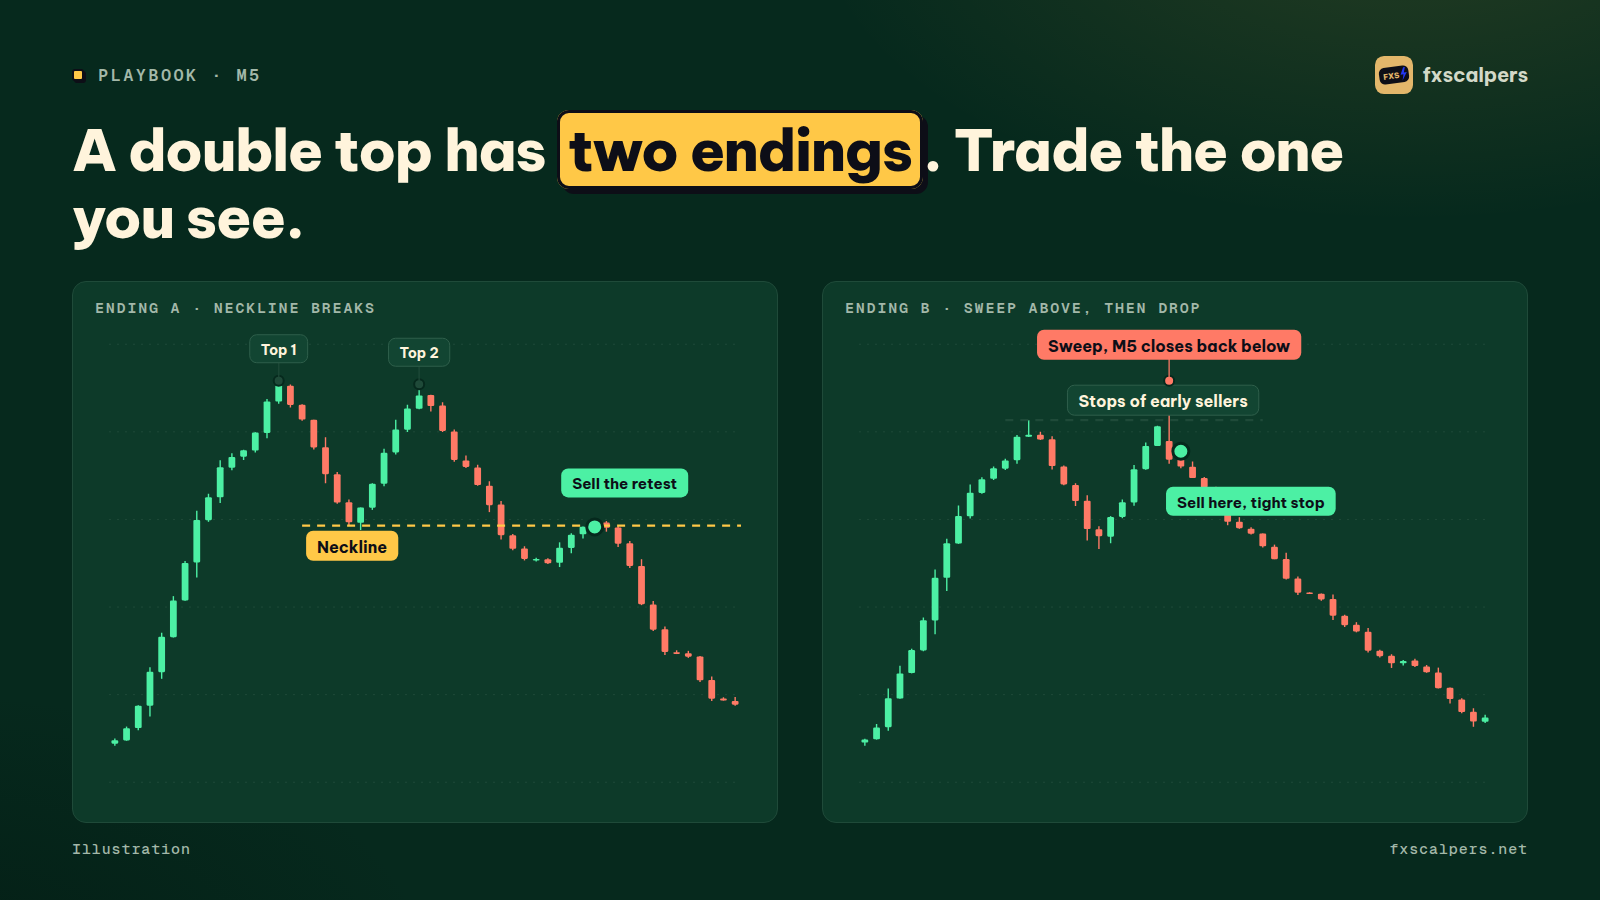
The double top is a pattern everyone can see. And because everyone sees it, the stops of everyone who sold early sit right above the second top. A double top on M5 ends one of two ways: price breaks the neckline and drops like the textbook says, or price sweeps above the second top to grab all those stops first, then drops. This playbook trades both endings, but never before it knows which one is happening.
The short version
- Only trade a valid double top: tops at least 10 M5 candles apart, second top within 3 pips of the first, a clear neckline, after a rally.
- Ending A: M5 closes below the neckline, sell the retest within 8 candles.
- Ending B: price sweeps 2 to 6 pips above the second top and closes back below: sell that close with a tight stop.
- Clearing the top by more than 8 pips with a close above it kills the pattern.
A valid double top
- The two tops are at least 10 M5 candles apart. Tops that close together are just a range.
- The second top is within 3 pips of the first (EUR/USD, USD/JPY).
- There’s a clear low between the two tops. That low is the neckline.
- The pattern forms after a rally. A double top in the middle of a range tells you nothing.
Ending A: the neckline breaks
Don’t sell the second top. Wait for an M5 candle to close below the neckline. Enter when price retests the neckline from below. No retest within 8 candles, no trade.
Stop above the retest high plus 2 pips, never exactly on it (here’s why). Target the pattern height (top to neckline) projected down from the neckline.
Ending B: sweep above the top, then drop
Price pushes 2 to 6 pips above the second top, then an M5 candle closes back below it. That’s a liquidity grab. Sell on that candle’s close, stop above the sweep high plus 2 pips. This entry has a much tighter stop than Ending A, because you’re entering right next to the invalidation point.
If price clears the second top by more than 8 pips and closes above it, that isn’t a sweep, it’s a real breakout. The double top is dead.
A worked example: Ending A
EUR/USD rallies into 1.0892 (top 1), dips to 1.0874 (the neckline), rallies back to 1.0890 (top 2, within 3 pips) fourteen candles later. An M5 candle closes at 1.0869, below the neckline. Four candles later price retests 1.0874 from below and stalls.
- Entry: 1.0873 on the retest.
- Stop: retest high 1.0877 plus 2 pips = 1.0879. Risk: 6 pips.
- Target: pattern height 18 pips (1.0892 to 1.0874) projected down from the neckline = 1.0856. Reward: 17 pips.
Almost 3R, and the stop sits above a level that had to hold for the trade to be valid. Illustrative prices.
A worked example: Ending B
Same pattern, but instead of breaking the neckline, price pushes to 1.0895, 5 pips above top 2, and the M5 candle closes back at 1.0886. Sell 1.0886, stop at the sweep high plus 2 pips = 1.0897 (11 pips), target the neckline first at 1.0874 and the measured move at 1.0856 for the runner. The trapped early buyers and the stops of the early sellers above the top both fuel the drop.
Pre-trade checklist
- Rally before the pattern? Tops 10+ candles apart, within 3 pips?
- Neckline close to horizontal?
- Which ending is in play: close below the neckline (A) or close back below after a sweep (B)?
- Stop beyond the retest high or sweep high plus the buffer, never on it.
- No high-impact news in the next 30 minutes? Check the calendar.
Double bottoms
Fully symmetrical. On gold specifically, the sweep under the second bottom tends to run deeper: use $1 to $3 instead of 2 to 6 pips.
Traps to avoid
A sloping neckline. When the low between the tops sits on a clear rising trendline, the neckline break is just a touch of that trendline, and price often bounces right back. Only trade Ending A when the neckline is close to horizontal.
Drill it before you trade real money
Mark 40 valid double tops on EUR/USD M5. Log whether each ended as A, B, or a breakout higher. That ratio matters more than any advice in this article, because it tells you which entry to wait for on the pair and session you trade.
Quick FAQ
Why not sell the second top directly?
Because you don’t know yet which ending you’ll get, and selling the top puts your stop exactly where Ending B goes to grab liquidity.
Does this work on higher timeframes?
Yes, the logic scales, but the pip numbers here are calibrated for M5 on EUR/USD and USD/JPY. Recalibrate buffers for H1 or for gold.
The Free channel posts pattern setups like this with the ending already confirmed and the stop placed beyond the level. Join and see both endings play out in real time.